
|
On Opening Oysters At the 2006 World Oyster Opening Championship in Galway, Ireland, an Irishman by the name of Michael Moran beat contestants from 17 other countries by opening 30 oysters in two minutes 35 seconds. It was the first win for Ireland in 10 years. However, Michael could not get close to the spectacular record his own father had set in the 1970s: One minute and 31 seconds. Now that the confidence is up, let's put a little damper on it: France produces anywhere from 130,000 to 145,000 metric tons of Pacific oysters annually. The French consume more than 90% of those oysters themselves - raw, on the half shell. Each year during the Christmas season, approximately 2,000 French oyster lovers seek medical help for injuries sustained while opening oysters. During the first attempt to open a fair sized oyster, a novice quickly learns that oysters live in truly remarkable shell fortresses. Without the right tools and some how-to pointers he or she is likely to get frustrated rather quickly, or worse, may end up bleeding all over the place - with the oyster probably still residing in its shell, perhaps "happy as a clam". In order to avoid such an unpleasant experience, an oyster novice should first consider the following: 1: Never use a kitchen knife to open
oysters! It is foolish and dangerous!
Oysters have a way of sometimes opening unexpectedly. The sharp
knife blade could easily glide through between the oyster shell
halves - right into your hand! The knife can also slip over or
under the shell housing - right into your hand or forearm. Incidentally,
the blade of any kitchen knife can easily be ruined by the hard
shell of an oyster. Before you buy oysters in the shell, consider
investing in an oyster
knife. Although it can obviously injure you too, at least
it is designed to do a much better job helping you open oysters.
4. When in doubt, throw it out! Any opened oyster that emits an odd or bad smell should be discarded immediately. The aroma of fresh oyster meat should always be pleasantly fresh, reminiscent of the ocean shore and the open sea. * Oyster Basics 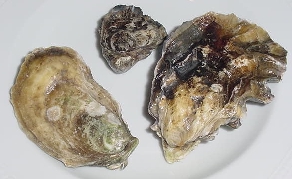 The "roundish" ones are far less common (and more expensive) than the "ovalish" ones. Naturalists have ordered this kind under the genus Ostrea. The big name in the western world is the European oyster (Ostrea edulis; pictured below). The very distant second place is held by the tiny Olympia oyster (Ostrea lurida a.k.a. Ostrea conchaphila). 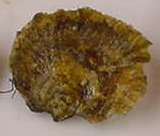 Frequently, based on respective growing environments and cultivation methods, sometimes also in part due to peculiar "whims" of the oysters, the oval ones may grow more "roundish" and the round ones may grow more "ovalish". Since I've now managed to sufficiently confuse the reader, let's move on to some more basics.
A few more Basics:
* Food Safety After opening each oyster, its meat should be sniffed briefly to make sure it does not smell odd or bad. Although an odd or bad smell is rare, it can happen. The ones that do should be disposed of immediately. When in doubt, throw it out! Oysters, regardless of whether they are still in the shell or have already been opened, should never be permitted to sit around at room temperature for any length of time. Place them in the refrigerator right after you're done working with them - even if you plan to cook or consume them raw within the next hour. Wash and hang dry your work gloves after
your done opening your oysters. Neoprene and other coated gloves
may be towel dried (not heat dried). Particularly wet fabric
and leather gloves left laying around are ideal breeding grounds
for bacteria. Inset pictures: In the picture above
you can see my simple set-up: Two stainless steel bowls and three
zip-lock bags. The larger stainless steel bowl is covered with
a steel mesh strainer (or common grease splatter guard). Piled
on top of the strainer are about three dozen extra small Pacific
oyster meats I've just removed from their shells. Next to the
big bowl is a smaller bowl with cold tap water. Since I intend
to freeze these oyster meats, the zip-lock bags are already duly
marked with the name of the oyster type, date, size, and the
quantity. The oyster meats and the precious oyster nectar trapped
in the large bowl (pictured) is then distributed equally among
the three baggies. Whatever If the opened oysters are destined to be slurped raw off the half shell, a large plate or tray needs to be ready where they can be deposited once opened. Most oysters on the half shell tend to tip over when placed on a plain surface and all their "juice" ends up running out of the shell half. It is best to have an adequate layer of crushed ice on a plate or tray ready where they will stay level more or less. A few notes: Ever since I got tired of smashing ice cubes with a hammer out in the garage, I simply use a thick layer of rock salt on the plate (about an inch or so deep). Rock salt is cheap and comes in a 4 lb box found in just about any large grocery store. Although a few of the salty rocks have a way of adhering a little to the moist outer oyster shell, they wipe right off. Once there are about a dozen oysters on that plate, it is covered with platic wrap and heads right into the refrigerator. Incidentally, clean aquarium pebbles from the pet store also work well. If you don't have crushed ice, rock salt, or clean pebbles, stabilize the oysters with some bunched up aluminum foil around each oyster. Oysters on the half shell should be served to your guests chilled and as soon as possible, most certainly within just a few hours. The sooner, the better! Never should they be served on the half shell after they've lounged in the refrigerator overnight. * Lastly: Good Lighting Use your own discretion on this one: Occasionally
you may spot a little bit of mud present around the edge inside
after opening the oyster. I personally consider this no big deal.
I simply dab it out gently with the tip of my finger under running
water. Losing a bit of plain sea water from inside the oyster
shell in the process is irrelevant when compared to unsightly
mud residue. What's important is that the bottom portion of the
adductor muscle is cut after this process, so the outflow
of the natural nectar of the oyster (its blood) is optimized.
For the same reason, it is a good idea to allow any oyster opened
for raw consumption from its half shell sit for just a short
while after opening. This allows its juices to flow a bit and
optimizes the taste of the exquisite liquid sipped or slurped
right along with the oyster meat. Some purists actually dump
the sea water right after opening the oyster and wait for the
pure nectar to collect a bit in the shell. They prefer their
nectar as "straight" as possible - not diluted by some
unremarkable water our oceans are full of. Health advisory: There is a risk associated with consuming raw oysters or any raw animal protein. If you have chronic illness of the liver, stomach, or blood or have immune disorders, you are at greatest risk of illness from raw oysters and should eat oysters fully cooked. If you are unsure of your risk, you should consult your physician.
Advisements on any errors discovered are most welcome: Contact
|
 * Oyster Layout
 * The
Hinge
* The
Hinge * Sizing up the Oyster
 * The powerful Adductor Muscle
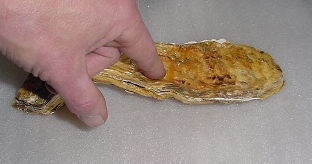
 The
single muscle design of an oyster is certainly an advantage for
us oyster lovers. Once we know where it is and are able to cut
it, the oyster's shell fortress has fallen. In this picture I
used a Pacific oyster to demonstrate estimating the approximate
location. Its location is the same on an Eastern oyster. With
the oyster "belly down" and its "beak" pointing
towards the opener, the oyster can be divided into two halves
with an imaginary line running from the beak to the front (bill)
of the oyster. The adductor is located slightly beyond the midpoint
of the line and to its right. Many oyster lovers will carefully
chip away the shell edge near this point to produce a little
opening - just enough to drive little more than the tip of the
knife inside the oyster to cut that muscle. Done properly, this
method will quickly open any oyster, no matter what species or
how big it is. I've named this approach the "
The
single muscle design of an oyster is certainly an advantage for
us oyster lovers. Once we know where it is and are able to cut
it, the oyster's shell fortress has fallen. In this picture I
used a Pacific oyster to demonstrate estimating the approximate
location. Its location is the same on an Eastern oyster. With
the oyster "belly down" and its "beak" pointing
towards the opener, the oyster can be divided into two halves
with an imaginary line running from the beak to the front (bill)
of the oyster. The adductor is located slightly beyond the midpoint
of the line and to its right. Many oyster lovers will carefully
chip away the shell edge near this point to produce a little
opening - just enough to drive little more than the tip of the
knife inside the oyster to cut that muscle. Done properly, this
method will quickly open any oyster, no matter what species or
how big it is. I've named this approach the " * Washing the Oysters
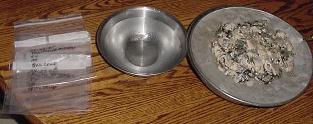 full of plain tap water
to eliminate any small shell fragments. I prefer to scrape
the meats onto a strainer placed on top of a bowl first, so the
oyster "juice" (called nectar or liqueur)
can drain off into the bowl while I'm opening more oysters. Then
I wash the oyster meats in another bowl. When I'm done, I pick
the meats out of the washing bowl full of water with my fingers
and place them right into the "juice bowl". If I'm
not going to use the oysters right away, I'll cover the bowl
with plastic wrap and place it in the refrigerator.
full of plain tap water
to eliminate any small shell fragments. I prefer to scrape
the meats onto a strainer placed on top of a bowl first, so the
oyster "juice" (called nectar or liqueur)
can drain off into the bowl while I'm opening more oysters. Then
I wash the oyster meats in another bowl. When I'm done, I pick
the meats out of the washing bowl full of water with my fingers
and place them right into the "juice bowl". If I'm
not going to use the oysters right away, I'll cover the bowl
with plastic wrap and place it in the refrigerator.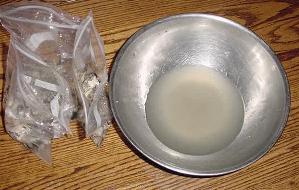 miniscule shell splinters that may have slipped through
the fine mesh of the strainer into the nectar have long settled
on the bottom of my "nectar bowl". A slow pour will
insure that they stay there. The bags are zipped shut and head
right to my freezer. I never freeze oysters longer than three
months.
miniscule shell splinters that may have slipped through
the fine mesh of the strainer into the nectar have long settled
on the bottom of my "nectar bowl". A slow pour will
insure that they stay there. The bags are zipped shut and head
right to my freezer. I never freeze oysters longer than three
months.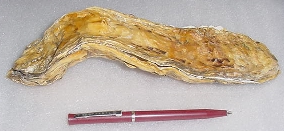