The Classic Method
John McCabe
 This method
opens an oyster via its hinge. Properly executed, it will always
result in the classic look of oysters destined to be served on
the half shell. The lower (cupped) shell portion where the oyster
meat rests will remain undamaged and retain its rugged beauty.
A classic oyster feast starts well before the oysters are actually
slurped. It begins with the flawless presentation of the oysters,
upon which the eyes will feast first.
This method
opens an oyster via its hinge. Properly executed, it will always
result in the classic look of oysters destined to be served on
the half shell. The lower (cupped) shell portion where the oyster
meat rests will remain undamaged and retain its rugged beauty.
A classic oyster feast starts well before the oysters are actually
slurped. It begins with the flawless presentation of the oysters,
upon which the eyes will feast first.
After briefly listing some advantages and disadvantages of this
method, my little report will try to demonstrate how opening
via the hinge is commonly done with the Pacific and Eastern oyster.
Then we'll touch on opening the European oyster and Olympia oyster
via the hinge. After that, the delicious Kumamoto oyster will
receive honorable mention. The report will close with a few general
pointers.
Please note: Novices will benefit from
reading the introduction page first before reading this or any
of the other reports on opening oysters.
Click here
to go there.
Advantages:
* The lower shell edge remains undamaged, thus enhancing the
oyster's natural presentation.
* Proper opening by the classic method minimizes the chance of
small shell fragments ending up in and around the oyster meat.
* Attractively shaped shells can be boiled and cleaned after
the feast to be reused for presenting many cooked oyster dishes.
Most desirable is an oyster shell that will sit stable and level
on the table without the help of rock salt, crushed ice, or bunched
up aluminum foil.
Disadvantages:
* Not well suited for Pacific and Eastern oysters beyond medium
size. The hinge sector in a larger oyster has grown very strong
and frequently proves to be difficult to penetrate and break.
It can also be difficult to cut the adductor muscle on large
oysters with long and oddly shaped shells (so called bananas).
The point of using this method on larger sizes is rather mute,
as they are only rarely (if ever) served raw on the half shell.
Proper presentation is thus not an issue as the meat of larger
sizes is usually cooked. Although many oyster lovers will also
slurp medium sized oysters, the principal sizes associated with
serving Pacific and Eastern oysters on the half shell are small
and extra small (a.k.a. petite, bistro, yearlings,…).
* Not an efficient commercial method where the main objective
is to open as many oysters as possible for meat destined for
cooking purposes. The clever
and clumsy methods
are easier, the commercial
method by far more efficient.
* Hinge opening is more prone to damage the liver of the oyster
(described below) than other opening methods.
 Pacific and Eastern Oysters
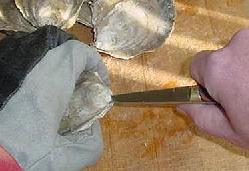
The oyster is held down firmly with the gloved hand on a stable
work surface (like a wooden cutting board). A right handed person
would use his or her left hand to hold the oyster. The right
hand holds the oyster knife. The hinge is always a little recessed
in the "beak" of the oyster, so chipping away a little
shell with the point of the oyster knife is common. Watch for
any mud, impurities, and excessive shell splinters while getting
at the hinge. Quickly rinse impurities off under running water
before proceeding.
The first step when reaching the hinge is
to patiently start digging through it with the tip of the oyster
knife. The hinge can be surprisingly tough on larger oysters.
 Note:
Brute force must be avoided, as it will only result in the hinge
snapping unexpectedly, the blade slamming into the oyster meat,
or worse, cracking the shell in the process or gouging the hand
holding the oyster.
Note:
Brute force must be avoided, as it will only result in the hinge
snapping unexpectedly, the blade slamming into the oyster meat,
or worse, cracking the shell in the process or gouging the hand
holding the oyster.
Soon the hinge will be perforated by the tip of the oyster
knife. Resist the natural temptation to run the blade into the
oyster at that moment. Instead, break the hinge completely and
spread the shell a bit with a twist of the knife handle. Note:
This is also the moment where the leverage benefit of an oyster
knife with an upwardly formed tip (unlike the one I'm using)
would come into play (examples pictured below).
 Then the flat side of the blade is slid
along the inside of the top shell towards the approximate location
of the adductor muscle. A little back and forth horizontally
will
cut it. The adductor muscle is very soft despite being very strong.
Too much back and forth with the blade must be avoided, as will
turn the delicate oyster meat inside into unsightly gray or brown
mush. Note: Some openers will guide the blade inside and around
the right side of the oyster shell to achieve the same result.
The right sweep is essential when the blade length is shorter
than the distance from the hinge to the adductor muscle. In this
picture I have the luxury of easily capping the muscle directly
with my long bladed Boston oyster
knife on this fairly large oyster.
Then the flat side of the blade is slid
along the inside of the top shell towards the approximate location
of the adductor muscle. A little back and forth horizontally
will
cut it. The adductor muscle is very soft despite being very strong.
Too much back and forth with the blade must be avoided, as will
turn the delicate oyster meat inside into unsightly gray or brown
mush. Note: Some openers will guide the blade inside and around
the right side of the oyster shell to achieve the same result.
The right sweep is essential when the blade length is shorter
than the distance from the hinge to the adductor muscle. In this
picture I have the luxury of easily capping the muscle directly
with my long bladed Boston oyster
knife on this fairly large oyster.
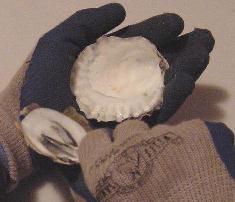
 Once the adductor muscle is cut, the oyster's
mighty shell fortress has fallen. The top shell will come right
off. If a little of the oyster's mantle flesh is still attached
to the top shell, just scrape it onto the oyster meat in the lower shell half. Note:
The oyster I used in this picture was rather large and unshapely
for slurping purposes (a medium Pacific oyster size). It did
prove to be delightfully fat. I had little choice but to take
a short break and slurp it right there on the spot. It was delicious.
Once the adductor muscle is cut, the oyster's
mighty shell fortress has fallen. The top shell will come right
off. If a little of the oyster's mantle flesh is still attached
to the top shell, just scrape it onto the oyster meat in the lower shell half. Note:
The oyster I used in this picture was rather large and unshapely
for slurping purposes (a medium Pacific oyster size). It did
prove to be delightfully fat. I had little choice but to take
a short break and slurp it right there on the spot. It was delicious.
 Visually inspect the opened oyster for
any potential shell splinters that may have snuck in. Briefly
sniff the aroma of the oyster flesh to make sure it smells fresh
and delightfully reminiscent of the ocean shore (get rid of it
immediately if it smells odd or bad!). Then gently slide the
tip of
the oyster knife under the meat to cut the base of the adductor
muscle. Optionally, the meat of the oyster could be flipped over
at this point (described below under pointers). Deposit
the half shell oyster on a prepared plate (as described in the
introduction).
Done!
Visually inspect the opened oyster for
any potential shell splinters that may have snuck in. Briefly
sniff the aroma of the oyster flesh to make sure it smells fresh
and delightfully reminiscent of the ocean shore (get rid of it
immediately if it smells odd or bad!). Then gently slide the
tip of
the oyster knife under the meat to cut the base of the adductor
muscle. Optionally, the meat of the oyster could be flipped over
at this point (described below under pointers). Deposit
the half shell oyster on a prepared plate (as described in the
introduction).
Done!
Before opening the next oyster, briefly
look at the glove that held the oyster and wipe or rinse off
any shell splinters that may be attached.

 European and Olympia Oyster
These two elegant oyster types are more delicate and should be
opened with more diligence. Many pros don't bother with the hinge.
They avoid the hinge and use a horizontal blade entry between
the shell halves to cut the adductor muscle. Some even hold the
oyster in their bare hand while doing so. Then they flip off
the top shell and "voilà!". They make it all
look so easy. It's not! Under no circumstance is the horizontal
side entry recommended for novices without first chipping off
some shell on the edge vertically to produce an opening (as described
in The Clever
Method).
 Inset images: Above, a nice batch of European oysters.
To the left, a nice batch of the petite Olympia oyster.
Inset images: Above, a nice batch of European oysters.
To the left, a nice batch of the petite Olympia oyster.
The European and Olympia oyster are designed
quite differently than the Eastern and Pacific oyster. They are
rounder, flatter, and the "beak" (hinge section) is
far less pronounced. The hinge is readily accesssible.
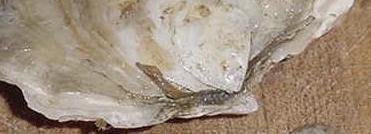
Above image: Hinge sector or "beak" of a European
oyster.
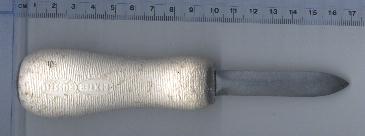
 Although a large selection of different
oyster knife styles will do a good job on Eastern and Pacific
oysters, choosing the right oyster knife is important with European
and Olympia oysters. Overall, European style oyster knives work
better on these oyster types than most North American oyster
knives. They have rather short blades, a very sharp point, and
frequently one or both sides of the blade have been sharpened.
Hence they are also more likely to cause injuries.
Although a large selection of different
oyster knife styles will do a good job on Eastern and Pacific
oysters, choosing the right oyster knife is important with European
and Olympia oysters. Overall, European style oyster knives work
better on these oyster types than most North American oyster
knives. They have rather short blades, a very sharp point, and
frequently one or both sides of the blade have been sharpened.
Hence they are also more likely to cause injuries.
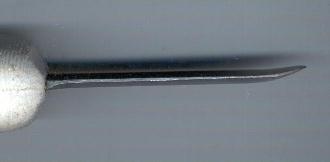
Inset picture: A French oyster knife design with a very pointed
tip and one sharp edge. It works well on European oysters.
However, after opening a few hundred of
these European and Olympia beauties and trying every type of
oyster knife in my arsenal while doing so, I did find one American
oyster knife style that also works very well via the hinge with
the Euros, Olys, and Kumamoto oysters. It's called a New Haven
and features a unique blade body and tip design.
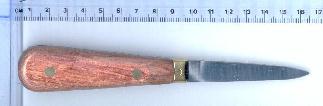
 Inset
picture: A New Haven style oyster knife. Besides being an excellent
knife for opening extra small and small Eastern and Pacific oysters
via the hinge, I have also found it to do a very good job with
European, Olympia, and Kumamoto oysters. The knife pictured was
made in USA by Dexter-Russell.
Inset
picture: A New Haven style oyster knife. Besides being an excellent
knife for opening extra small and small Eastern and Pacific oysters
via the hinge, I have also found it to do a very good job with
European, Olympia, and Kumamoto oysters. The knife pictured was
made in USA by Dexter-Russell.
 Enough talk. Let's open a Euro:
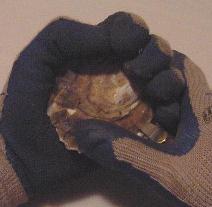
The gloved hand holds the oyster firmly in the left hand
(on a right handed person). The hand with the oyster rests firmly
on the cutting board. Unlike the Eastern and Pacific oyster,
the European oyster might be angled upward a tad (perhaps about
45°). I rest my left hand rather than the edge of the shell
on the cutting board, as I do not wish any portion of this margin
to break off accidentally while I'm working. Conversely, I like
to hold the cupped portion of the tiny Olympia oyster down on
the cutting board with my fingers. Just experiment a little.
Whatever works best for you in the end is the right way.
The hinge on both oyster types is weak
and easily penetrated with the sharp point of the oyster knife.
Unlike the direct hinge approach on the Eastern and Pacific oyster,
I've found it better to choose a point of attack to the right
of the hinge.
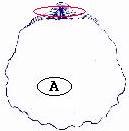
 Once the hinge is broken and the shell halves are
spread apart a bit, the adductor muscle can then be cut with
ease. Inset picture: Note its rather central location in this
case (little pointer in the picture). Extra care must be taken
not to damage the tender meat by keeping the knife tip up while
cutting. The oyster's liver is located just ahead of the hinge
(located right at the oposite end of the little pointer). It
is particularly vulnerable and will end up looking like a big
greenish-brown spot if its mantle layer is damaged by the knife.
Always remember to cut the base of the adductor muscle as well
before serving (described above).
Once the hinge is broken and the shell halves are
spread apart a bit, the adductor muscle can then be cut with
ease. Inset picture: Note its rather central location in this
case (little pointer in the picture). Extra care must be taken
not to damage the tender meat by keeping the knife tip up while
cutting. The oyster's liver is located just ahead of the hinge
(located right at the oposite end of the little pointer). It
is particularly vulnerable and will end up looking like a big
greenish-brown spot if its mantle layer is damaged by the knife.
Always remember to cut the base of the adductor muscle as well
before serving (described above).
Olympia Oyster
I call this oyster the Emerald
Princess because of the unique shell layer upon which its
tender flesh rests. This pearly looking layer (the so called
hypostracum) is unusually rich with nacre (pearl coating)
and frequently shows an emerald colored hue. The Olympia oyster
is a "sipping oyster" rather than a "slurping
oyster". It possesses a unique flavor which should be savored
in a dignified manner - not unlike sipping a venerable old Scotch
or rare Cognac. Consider yourself honored and privileged when
commissioned to open the noble Olympia oyster for half shell
presentation. Obviously someone believes you are worthy. No "hack
'n slash oyster openers" on this one please. If you have
developed the finesse to open a dozen Olympia oysters in a row
for half shell presentation without damaging the cupped portion
of her majesty's splendid little shell palace and any of her
tender flesh, you are a master at opening oysters for half shell
consumption! Since most oyster lovers of the world have never
heard of or seen an Olympia oyster, let alone tasted one, the
person ordering the venerable Emerald Princess on the
half shell will very likely be an oyster connoisseur of the first
order.
Let's get started on that Oly
The pictures sequence below shows
one of several methods of easily opening Olympia oysters.
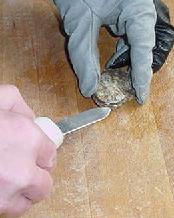
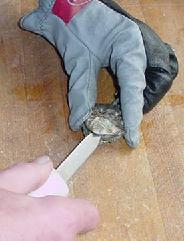
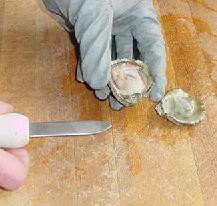
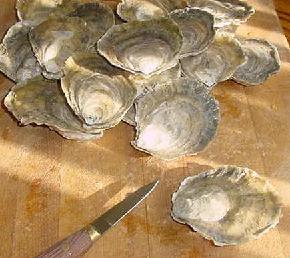
 Image left: Freshly
opened Olympia oysters on the half shell. No flesh damage (particularly
no liver damage), no obvious shell damage, and the adductor muscle
in the lower shell has been cut close to the shell (click image
to enlarge). Consolation: If it does not end up looking perfectly,
it will nonetheless still taste perfectly.
"Flipping" the meat (described below) is optional.
Image left: Freshly
opened Olympia oysters on the half shell. No flesh damage (particularly
no liver damage), no obvious shell damage, and the adductor muscle
in the lower shell has been cut close to the shell (click image
to enlarge). Consolation: If it does not end up looking perfectly,
it will nonetheless still taste perfectly.
"Flipping" the meat (described below) is optional.
 Kumamoto Oyster
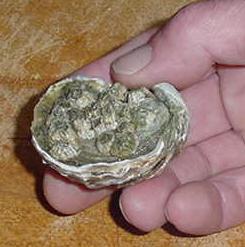
The Kumamoto oyster (often affectionately referred to as the
Kumo) might be considered the connoisseur's precious link
between the Pacific and Eastern oyster and the European and Olympia
oyster. It's a small and very tasty "butterball" of
sorts with a pronounced belly and a flat lid (the Kumo is closely
related to the Pacific and Eastern oyster).
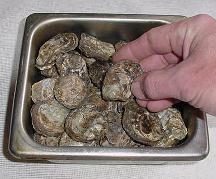
Inset image: A typical Kumo. The extra
barnacles on the top shell were free of charge.
There's nothing to add in terms of
opening Kumos that has not already been stated above. If you have
not tried Kumos, make sure you seize upon the next opportunity
to do so.
 Image left: Freshly opened Kumamoto oysters on
the half shell.
Image left: Freshly opened Kumamoto oysters on
the half shell.
General Pointers
* The Flip Trick
 If you wish to give any oyster's meat a more "plump
and creamy" look or are worried that someone may perceive
the oyster as looking just a tad too "biological",
you can simply flip it. It is also a great way to hide little
opening screw-ups like that greenish-brown spot you see in the
meat just ahead of the hinge. I handled my oyster knife poorly
on this one and damaged the oyster's tender mantle, thus also
exposing a little bit of the rather unsightly liver.
If you wish to give any oyster's meat a more "plump
and creamy" look or are worried that someone may perceive
the oyster as looking just a tad too "biological",
you can simply flip it. It is also a great way to hide little
opening screw-ups like that greenish-brown spot you see in the
meat just ahead of the hinge. I handled my oyster knife poorly
on this one and damaged the oyster's tender mantle, thus also
exposing a little bit of the rather unsightly liver.
 After
cutting the adductor muscle under the meat, the oyster is simply
flipped over inside its shell with the tip of the knife. Best
of all: My screw-up on the liver is now also hidden. Note:
The darker margin on the upper edge of the shell in the picture
is a slight natural shell flaw. At some point the oyster suffered
a small crack which it repaired. It is perfectly acceptable.
Any mud residue, however, is not acceptable.
After
cutting the adductor muscle under the meat, the oyster is simply
flipped over inside its shell with the tip of the knife. Best
of all: My screw-up on the liver is now also hidden. Note:
The darker margin on the upper edge of the shell in the picture
is a slight natural shell flaw. At some point the oyster suffered
a small crack which it repaired. It is perfectly acceptable.
Any mud residue, however, is not acceptable.
* On the Flat
There's a relatively small constituency of oyster lovers among
us that actually prefers its oysters on the half shell to be
served on the inside portion of the top shell instead of the
more cupped shell (most of them are European slurpers). The serving
method is formally called "on the flat". That constituency
has been around for hundreds of years. I respect it because I
firmly believe that any oyster lover should consume his or her
oysters just the way he or she likes to. What I can do without
though, is when some of them start preaching: "You do
know that that's the proper way for oysters to be served.
Don't you?" I just grin and bear it - and hand them
an extra napkin for the wet mollusk blobs that may end up in
their lap.
* Liver Damage
The liver of any oyster can easily be damaged, particularly
if the classic method of opening via the hinge is employed. It
does not take much to strip off the delicate mantle flesh covering
the liver. Speading the shell halves apart a bit with the knife
blade by twisting the handle after breaking the hinge and keeping
the blade tip riding high on the underside of the upper shell
goes a long way to avoid "liver damage". Although such
damage has no effect at all on the taste of the oyster meat,
it just looks bad. The greenish-brown spot sticks out like a
sore thumb. I've heard novices ask "Eeeew. Is that oyster
poop?" when they see that 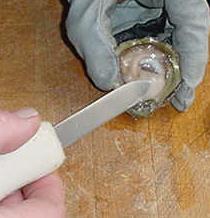 spot. If you
are serving lots of oysters with damaged livers to connoisseurs,
they may not comment on it, but will certainly notice. Inset
image: The tip of my knife points at the location of the (undamaged)
liver on this Olympia oyster. The liver is located in just about
the same spot on any oyster.
spot. If you
are serving lots of oysters with damaged livers to connoisseurs,
they may not comment on it, but will certainly notice. Inset
image: The tip of my knife points at the location of the (undamaged)
liver on this Olympia oyster. The liver is located in just about
the same spot on any oyster.
 * European Hinge Method Variant
Merely for the sake of completeness on the hinge method topic:
The author Robert Neild, in his marvelous book The English,
The French and The Oyster (Quiller; 1995), introduced me
to another hinge method I had not known of. Some experienced
European openers apparently will use the sharp edge of an oyster
knife to cut through the hinge of a European oyster. No doubt,
this method should certainly be left to the pros. I've attempted
to replicate this method with an empty "pretend" European
oyster, because my verbal description would likely to be a bit
too confusing.
 First
they wedge the European oyster firmly in the palm and thumb of
their left hand (if right handed) with the beak facing out towards
the outstretched four fingers. Then, with the right hand, they align
the sharp knife edge with the line of the oyster hinge.
First
they wedge the European oyster firmly in the palm and thumb of
their left hand (if right handed) with the beak facing out towards
the outstretched four fingers. Then, with the right hand, they align
the sharp knife edge with the line of the oyster hinge.
 They'll then bring up the four fingers of the hand
holding the oyster to exert force on the dull back edge of that
knife, thus forcing the sharp edge into the hinge and snapping
it. Meanwhile, the thumb of the right hand holding the knife
is applied to the upper shell of the oyster for stability. Once
the knife enters, it is led forward to cut the adductor muscle.
Once the blade has cut the adductor muscle, the thumb of the
right hand and the knife blade inside pincers the top shell.
They'll then bring up the four fingers of the hand
holding the oyster to exert force on the dull back edge of that
knife, thus forcing the sharp edge into the hinge and snapping
it. Meanwhile, the thumb of the right hand holding the knife
is applied to the upper shell of the oyster for stability. Once
the knife enters, it is led forward to cut the adductor muscle.
Once the blade has cut the adductor muscle, the thumb of the
right hand and the knife blade inside pincers the top shell.
 With the adductor muscle now severed, the top shell folds back easily. This
method is reminiscent of a clam opening method which, however,
penetrates the front shell divide instead of the hinge. Needless
to say, this is one of those "please don't try this at home"
methods, as it can certainly lead to injuries very easily in
inexperienced hands - and has very likely also cut many an experienced
oysterman. Frequent unsightly damage to the oyster's liver would
also seem likely with this method.
With the adductor muscle now severed, the top shell folds back easily. This
method is reminiscent of a clam opening method which, however,
penetrates the front shell divide instead of the hinge. Needless
to say, this is one of those "please don't try this at home"
methods, as it can certainly lead to injuries very easily in
inexperienced hands - and has very likely also cut many an experienced
oysterman. Frequent unsightly damage to the oyster's liver would
also seem likely with this method.
 * Best Suited
Knife Type for Hinge Method
* Best Suited
Knife Type for Hinge Method
Any oyster knife will open
a small or medium sized oyster from the hinge. However, a knife
design with a raised tip usually works best. Firstly, this tip
design allows excellent leverage at the hinge. Secondly, the
tip tends to travel high inside the oyster, above and away from
the tender meat. The opener can more easily direct the knife
to hug the underside of the top shell. This helps reduce the
chance of unsightly organ and mantle damage.

